TL;DR
Placing your rig in a closet isn’t just about hiding noise. Proper placement, treatment, and ventilation are key. With a few tweaks, your tiny space can produce studio-quality sound while staying whisper-quiet.
Imagine turning a tiny, cluttered closet into your personal recording studio. It’s a common dream, especially for home creators with limited space. But simply shoving a mic in a closet won’t cut it—soundproofing and placement matter more than you think.
This guide cuts through the noise—literally and figuratively. You’ll learn how to make your closet sound better, block noise leaks, and position your gear for professional results. Whether you’re recording vocals or voice-overs, these tips turn a cramped corner into a sonic haven. Acoustic dampening and placement tips can help optimize your setup.
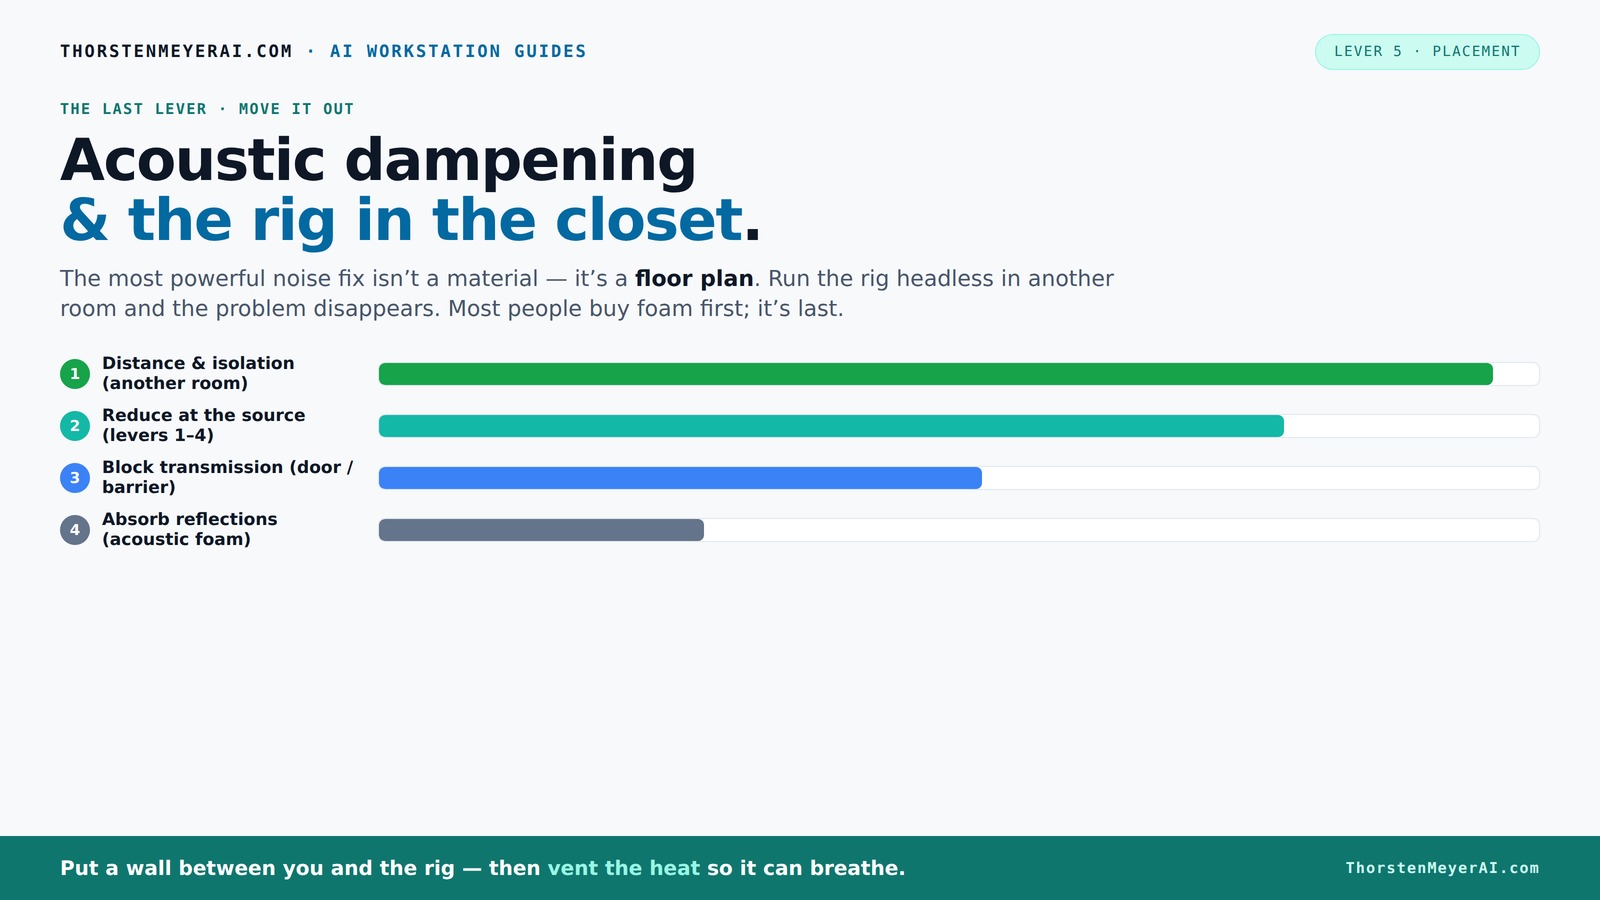
Acoustic dampening
& the rig in the closet.
The most powerful noise fix isn’t a material — it’s a floor plan. A rig you can’t hear because it’s in another room beats any amount of foam. Tap the approaches in Part 1 to see what actually works.
(another room)
(levers 1–4)
(door / barrier)
(acoustic foam)
Contain the noise, not the heat
Key Takeaways
- Start with placement: position your mic and gear to minimize reflections and leakage.
- Treat the door and gaps first—sealing leaks makes a huge difference in sound isolation.
- Use broad coverage on walls and ceiling, not just corners, for better sound control.
- Control low frequencies with bass traps—thick panels in the corners are essential.
- A closet can be a great space if you treat it properly, but structural modifications are needed for true isolation.

Focusound 52 Pack Acoustic Foam Panels 1" x 12" x 12" Sound Proof Foam Panles Soundproofing Noise Cancelling Wedge Panels for Home Office Recoding Studio with 300PCS Double-Side Adhesive
Soundproofing - Acoustic foam panels triangular grooves structure for better noise absorption, helps to reduce and absorb unwanted...
As an affiliate, we earn on qualifying purchases.
As an affiliate, we earn on qualifying purchases.
Why Your Closet Is a Hidden Goldmine for Sound (And How to Use It Right)
Closets are surprisingly good for sound because of their small volume. They naturally cut down echo and reverb, making recordings clearer. But this only works if you treat the space right and don’t trap heat or make it soundproof in a way that causes overheating. For more insights, see soundproofing tips for small spaces.
Think of your closet as a mini sound chamber. If you position your mic correctly, avoid parallel surfaces, and add some padding, you can get cleaner recordings than in a large, echoey room. The key is understanding what needs dampening and what doesn’t.

8 Pack - Bass Traps Acoustic Foam Corner, 8''x8''x12'' Black Bass Traps Corner Studio Foam, High Density and Fire-Proof Acoustic Panels Recording Studio Acoustical Treatments
Acoustic Principle- Bass Trap is a kind of sound absorbing structure specially used to absorb specific low-frequency standing...
As an affiliate, we earn on qualifying purchases.
As an affiliate, we earn on qualifying purchases.
Mastering Mic Placement for Clear, Natural Sound in Tiny Spaces
Where you put the mic makes all the difference. In a closet, the main reflection point is often the wall behind the mic. Keep the mic about 6-12 inches away from the wall to minimize reflection and echo. Use a shock mount and pop filter to reduce vibrations and plosive sounds. Mic placement techniques are crucial for clear recordings.
For example, hang the mic on a boom arm, and position it slightly off-center from the wall. Experiment with angles—sometimes pointing away from reflective surfaces yields a warmer, more natural tone. Remember, the goal is to keep the direct sound strong while minimizing reflected sound.

Dmsky Microphone Isolation Shield with Pop Filter & Tripod Stand, Foldable Mic Shield with Triple Sound Insulation, High Density Mic Sound Shield for Recording Studio, Podcasts, Singing, Broadcasting
【Excellent noise reduction】Triple Sound Insulation,foldable Microphone Isolation with reflective layer+filter layer+absorbing layer.the high-density acoustic foam that eliminates audio...
As an affiliate, we earn on qualifying purchases.
As an affiliate, we earn on qualifying purchases.
Walls, Ceiling, and Door: How to Seal and Treat for Quiet and Clarity
Acoustic treatment isn’t just about sticking foam on the walls. Start with sealing gaps around the door with weatherstripping or acoustic sealant. Small cracks can leak sound—big time. Cover the door with moving blankets or install an acoustic door sweep for extra quiet. Door sealing tips can improve sound isolation.
On the walls and ceiling, broad coverage matters more than just corners. Use 2-inch thick panels for small spaces; larger spaces or low-frequency issues benefit from 4-inch bass traps. Think of it like wrapping your closet in a soft, dampening blanket that blocks sound from escaping or entering.

Sound Addicted - Studio Monitor Isolation Pads for 5 Inch Monitors, Pair of Two High Density Acoustic Foam which Fits Most Speaker Stands | SMPad 5
SMPad 5 is made out of the highest quality acoustical foam (50kg/m^3 density).
As an affiliate, we earn on qualifying purchases.
As an affiliate, we earn on qualifying purchases.
Blankets, Foam, and Panels: What Really Works for Soundproofing?
Acoustic foam and panels mainly reduce inside reflections—they’re not true soundproofing. For actual noise blocking, you need mass, sealant, and vibration isolation. Think of foam as a way to soften echoes, not to stop sound from leaking out.
Use thick blankets on the door, and consider adding mass-loaded vinyl or drywall for serious soundproofing. For example, hanging thick moving blankets a few inches off the wall can significantly cut reverb and echo, making your recordings clearer without breaking the bank.
Bass Buildup in Small Spaces: How to Keep Your Sound Tight
Small closets tend to amplify low frequencies, creating a booming, muddy sound. This occurs because the confined space causes low-end frequencies to resonate and build up, leading to a boxy, unnatural tone in recordings. To prevent this, installing bass traps in the corners is crucial. Thick panels (4 inches or more) absorb these problematic frequencies before they cause muddiness. For detailed guidance, see bass trap placement.
Placing bass traps at the junctions where walls meet ceiling and floor maximizes their effectiveness. For DIY solutions, stacking dense fiberglass panels or hanging thick towels in the corners can serve as a cost-effective alternative. Managing bass buildup is essential because unchecked low frequencies can mask vocal clarity and make your recordings sound unprofessional. Proper treatment ensures your voice remains crisp and well-defined, even in a small, enclosed space.
Floor, Desk, and Reflection Control in a Closet Setup
Hard surfaces like floors and desks reflect sound directly into the mic, adding echo and harshness. Cover the floor with rugs or carpets to absorb reflections. Placing foam or blankets on or around your desk can also help tame these reflections. Reflection control tips are useful for improving sound quality.
In a real-world scenario, a voice-over artist placed a thick rug under her mic stand. The result? Less echo and a warmer tone. The idea is simple: soften the surfaces that reflect sound directly into your microphone.
When a Closet Isn’t Enough: Recognizing the Limits
While a closet can be a surprisingly good sound booth, it’s not magic. If you notice persistent low-end boom or sound leakage, structural modifications are needed. Adding drywall, decoupling the walls, or installing specialized soundproof doors make a huge difference.
For example, a DIY musician added a layer of drywall with Green Glue between layers, dramatically reducing sound leakage. If you want professional-quality isolation, soft treatments aren’t enough—they need to be part of a larger, structural approach.
Frequently Asked Questions
Where should I place acoustic treatment in a closet booth?
Focus on the main reflection points—behind the mic and the ceiling. Covering the walls around the mic, especially the wall behind it, reduces echo and reverb. Don’t forget to treat the door with blankets or weatherstripping to stop sound leaks.
Should I treat the walls, ceiling, corners, or door first?
Start with sealing gaps around the door and treating the wall behind the mic. Then, add broad coverage on the walls and ceiling. Corners are good for bass traps but aren’t enough alone—cover the entire space for best results.
How much coverage do I actually need?
For a small closet, aim for at least 50-60% coverage of the wall and ceiling surfaces with 2- to 4-inch thick panels. Focus on the reflection points and door, then add bass traps in the corners if low-end issues persist.
How far should foam, blankets, or panels be from the wall?
Keep acoustic panels about 2-4 inches away from the wall. This spacing improves absorption efficiency by allowing sound waves to dissipate before bouncing back. Hanging blankets a few inches off the door helps reduce sound leaks and reverb.
Do acoustic foam panels soundproof a closet?
Not really. Foam panels mainly absorb inside reflections—they don’t block sound from escaping. For true soundproofing, you need mass, sealing, and structural decoupling. Foam makes your recordings clearer but isn’t a barrier to noise leakage.
Conclusion
Transforming a closet into a recording space isn’t about patching it with foam. It’s about smart placement, sealing leaks, and broad treatment. When you balance these, your tiny room can produce sound that rivals much bigger studios.
So, take a step back, assess your space, and treat it like a mini studio. With a few tweaks, your closet can be your best-kept secret for pristine recordings — quiet, clear, and professional.