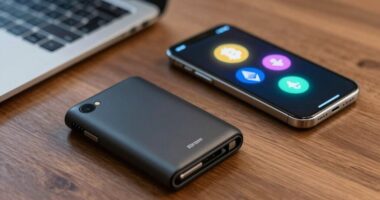

This guide explains how to set up a cryptocurrency hardware wallet to store your digital currencies securely. It covers selecting a device, initializing it, and ensuring your funds are protected. Designed for beginners and those with some experience, this process takes approximately 30 to 60 minutes. Follow these steps carefully to avoid common security mistakes and confirm your setup is correct.

Ledger Nano X Crypto Wallet Signer – Bluetooth Enabled, Onyx Black
- ✔ Connectivity: Bluetooth
- ✔ Compatibility: iOS
- ✔ Color: Onyx Black

Tangem Crypto Wallet Pack of 2 – Cold Storage Hardware Wallet for Bitcoin, Ethereum, NFTs & Altcoins
- ✔ Number of wallets: 2
- ✔ Supported coins: 14,100+
- ✔ Security: EAL6+

Ledger Nano S Plus – Classic Crypto Wallet, Gold, Compact, 1.1" Display, Desktop & Android Compatible
- ✔ Display: 1.1 inches
- ✔ Connectivity: USB-C
- ✔ Compatibility: Desktop (Windows, macOS, Linux), Android
Difficulty: Beginner | Time: 30-60 minutes
What You’ll Need
Tools & Materials:
- Hardware wallet device (e.g., Ledger, Trezor)
- Computer or smartphone
- Internet connection
- Paper and pen for notes
Knowledge:
- Basic understanding of cryptocurrencies
- Familiarity with online security practices
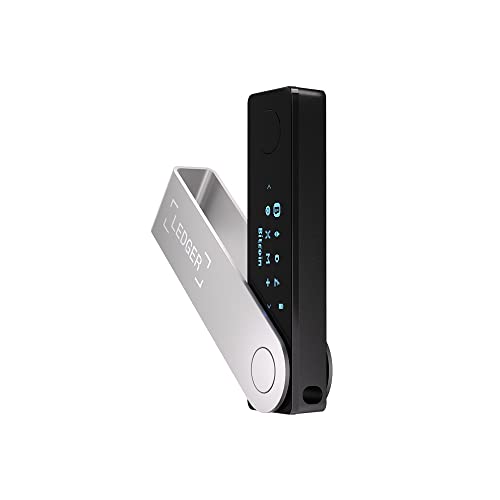
Ledger Nano X Crypto Wallet Signer - Securely Manage All Your Crypto Assets with This Bluetooth Enabled Classic - Onyx Black
Effortlessly build your crypto portfolio via the all in one Ledger Wallet app: buy, sell, send, receive, swap,...
As an affiliate, we earn on qualifying purchases.
Ledger Nano X Crypto Wallet Signer – Bluetooth Enabled, Onyx Black
The Ledger Nano X stands out for its Bluetooth connectivity, allowing seamless management of cryptocurrencies via iOS devices. Its support for over 15,000 coins and tokens makes it a versatile choice for diverse portfolios. Compared to the Nano S Plus, it offers wireless convenience, but at the expense of a slightly more complex setup and potential security concerns associated with Bluetooth. It’s ideal for users who value mobility and multi-asset support, though it may be less suitable for those prioritizing offline security or simplicity.
Pros:
- Supports over 15,000 coins and tokens
- Wireless Bluetooth connectivity for on-the-go management
- Secure backup signer with authentication
Cons:
- Product color may vary slightly from pictures
- Requires careful handling to avoid scratches
- Battery life details not specified
Best for: Crypto users wanting mobile management and extensive coin support
Not ideal for: Users seeking maximum offline security or those with limited Bluetooth comfort
Bottom line: A top pick for mobile-savvy users needing broad asset support with convenient wireless features.
“A top pick for mobile-savvy users needing broad asset support with convenient wireless features.”

TANGEM Crypto Wallet Pack of 2 – Trusted Cold Storage Hardware Wallet
Proven security at scale: Over 9 years and millions of cards issued with no known remote hacks, while...
As an affiliate, we earn on qualifying purchases.
Tangem Crypto Wallet Pack of 2 – Cold Storage Hardware Wallet for Bitcoin, Ethereum, NFTs & Altcoins
The Tangem pack offers military-grade security with two waterproof, shockproof wallets designed for offline storage. Its support for over 14,100 coins and tokens makes it ideal for long-term investors who prioritize security over quick online access. Unlike the Ledger Nano X, Tangem wallets do not connect via Bluetooth or USB, making them less convenient for frequent transactions but far superior for secure, offline storage. They are perfect for securely storing large holdings, NFTs, or participating in DeFi projects without exposing assets to online risks.
Pros:
- Supports over 14,100 coins and tokens
- Waterproof, shockproof, and durable for long-term use
- No cables, batteries, or setup required
Cons:
- Requires physical management of hardware wallets
- No online access for quick transactions
- Potentially higher cost compared to software wallets
Best for: Long-term holders needing ultra-secure offline storage
Not ideal for: Users requiring quick online transactions or regular trading
Bottom line: Best suited for long-term, offline storage of large crypto holdings and NFTs with maximum security.
“Best suited for long-term, offline storage of large crypto holdings and NFTs with maximum security.”

Ledger Nano S Plus - Classic Crypto Wallet
All your digital assets in one place. You can manage thousands of crypto including Bitcoin, Ethereum, Solana, Tether...
As an affiliate, we earn on qualifying purchases.
Ledger Nano S Plus – Classic Crypto Wallet, Gold, Compact, 1.1" Display, Desktop & Android Compatible
The Ledger Nano S Plus offers strong security with a 1.1-inch display and broad coin support, including Bitcoin, Ethereum, and Solana. Its USB-C connectivity makes it ideal for desktop and Android users who prefer wired connections over wireless options. Compared to the Nano X, the Nano S Plus lacks Bluetooth, but it compensates with a lower price point and robust security features such as a certified Secure Element and offline private keys. It’s best for those who want reliable security without sacrificing support for their favorite assets but don’t need mobile wireless features.
Pros:
- Supports over 15,000 cryptocurrencies
- High security with certified Secure Element
- Compatible with desktop and Android devices
Cons:
- Not compatible with iOS devices
- No Bluetooth connectivity
- Requires USB-C connection
Best for: Desktop or Android users seeking high security and broad crypto support
Not ideal for: iOS users or those who prefer wireless, mobile management
Bottom line: A reliable, secure choice for desktop and Android users prioritizing extensive coin support and wired connectivity.
“A reliable, secure choice for desktop and Android users prioritizing extensive coin support and wired connectivity.”
As an Amazon Associate we earn from qualifying purchases.
Before You Start
Verify that you are in a private, secure environment free from surveillance or potential malware. Do not connect your hardware wallet to an infected or compromised device. Keep your recovery seed and PIN information confidential and offline until the setup is complete.
Step-by-Step Instructions
Step 1: Choose the right hardware wallet
Select a reputable hardware wallet device from well-known brands like Ledger or Trezor. Purchase directly from the manufacturer or authorized retailer to prevent tampering.
Tip: Avoid buying second-hand or from unverified sources to prevent compromised devices.
Check: You have the original, sealed device from a trusted source, ready for setup.
Step 2: Unbox and connect the device
Remove the hardware wallet from its packaging and connect it to your computer or smartphone using the provided USB cable or compatible connection method.
Tip: Handle the device carefully to avoid damage. Make sure your connection is secure before proceeding.
Check: The device powers on and displays the initial welcome or setup screen.
Step 3: Download the official setup software
Visit the official website of the hardware wallet manufacturer and download the latest setup or management app for your device.
Tip: Verify the website URL and check for secure HTTPS connection to prevent phishing.
Check: You have downloaded the correct, official software compatible with your device.
Step 4: Initialize and set up your device
Follow the on-screen instructions to initialize your hardware wallet. Choose a PIN code that is unique and not easily guessable.
Tip: Use a PIN length of at least 4 digits; avoid simple combinations like 0000 or 1234.
Check: Your device is initialized with a PIN, and you see options for recovery seed generation.
Step 5: Write down your recovery seed
Write down the 12-24 word recovery seed displayed on the device on a piece of paper. Store this seed in a safe, offline location.
Tip: Do not store the seed digitally or share it with anyone. Confirm you have written all words accurately.
Check: You have recorded the entire recovery seed correctly, with no omissions or errors.
Step 6: Verify your recovery seed
Follow the device prompts to verify your recovery seed by selecting or confirming the words in the correct order.
Tip: This step confirms you have accurately recorded the seed; do not skip it.
Check: Your device confirms the seed is correct, and setup proceeds to the wallet interface.
Step 7: Install and connect wallet management software
Install the official wallet management app on your computer or smartphone, then connect your hardware wallet to access your wallet interface.
Tip: Keep your software updated to the latest version for security and compatibility.
Check: Your device appears in the app, and you can view your wallet’s account details.
Step 8: Add cryptocurrency accounts
Create accounts for the cryptocurrencies you plan to store, following the app prompts, and ensure they are properly linked to your device.
Tip: Confirm each account displays the correct address before sending funds.
Check: Your accounts are visible and you can generate public addresses for receiving funds.
Common Mistakes to Avoid
- Not securely storing the recovery seed — Write the seed on paper and store it offline in a safe location; never digitalize or share it.
- Using a PIN that is easy to guess — Choose a complex PIN that you can remember but others cannot guess, avoiding common patterns.
- Connecting to unofficial or compromised software — Download setup and management apps only from official websites and verify their authenticity.
- Neglecting to verify the recovery seed — Always verify your recorded seed by following the device prompts before completing setup.
Troubleshooting
Problem: Device not powering on or recognized
Solution: Check connections, try a different USB port, or restart your computer. Confirm the device is properly connected and intact.
Problem: Incorrect recovery seed during verification
Solution: Re-record the seed carefully, ensuring no words are missed or swapped. Repeat the verification step.
Problem: Software not recognizing device
Solution: Ensure you downloaded the correct app version, update your drivers if needed, and restart your device.
Problem: Device displaying errors or malfunctioning
Solution: Reset the device if possible, or consult the manufacturer’s support resources for troubleshooting.
What Success Looks Like
You have successfully initialized your hardware wallet, recorded and verified your recovery seed, and can generate addresses and view your account balances through the official management software. Your funds are stored securely offline, and the setup process is complete.
Next Steps
After setup, transfer existing cryptocurrencies to your new hardware wallet address. Keep your recovery seed and PIN secure, and review your security practices regularly. Consider enabling additional features like passphrase protection for extra security.
Frequently Asked Questions
Can I change my PIN later?
Yes, most hardware wallets allow you to change your PIN through the device settings. Follow the device’s instructions to do so securely.
What should I do if I lose my recovery seed?
If you lose your seed, you cannot recover your funds if the device fails or is lost. Store the seed in a secure, offline location and consider creating multiple backups.
Is it safe to connect my hardware wallet to a computer or phone?
Yes, if you use your device with trusted, secure devices and official software. Avoid connecting to compromised or infected systems to prevent theft of your seed or funds.
How often should I update my device firmware?
Update your firmware when new versions are released to patch security vulnerabilities and improve functionality. Follow the manufacturer’s instructions carefully during updates.